
CARBURETOR TUNING TIPS
 Print or Save Tuning Tips
Congratulations on the purchase of your new AED Carburetor. Your AED Carburetor is hand built, test run and double checked for performance right out of the box. Typically the idle speed is the only adjustment needed however this short reference guide is intended to explain the correct method to set-up your new AED carburetor. It will cover all of the basic adjustments that you may run into in a step-by-step guide to ensure both your car and your new AED Carburetor will perform to their best potential.
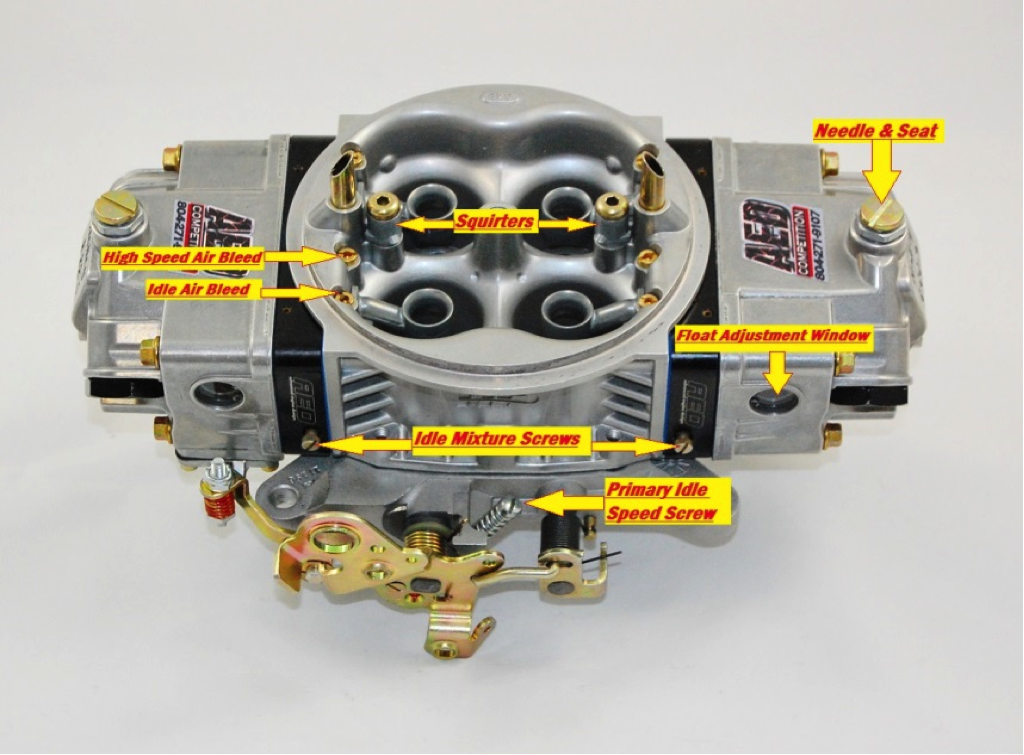
REFERENCE DIAGRAM OF PART NAMES & LOCATION
Initial carburetor set-up
- Be sure to use a new carburetor-to-manifold gasket
- Be sure all fuel supply lines are secure and free of leaks
- Make sure you are using fresh fuel that is free of trash/debris
- Fuel pressure should be set @ 6 to 7 psi. Max ( Gas models)
 Start the engine and check float level adjustment – The level should be ½ - ¾ of the way up in the sight window. The level can be adjusted with the nut & lockscrew on top of each bowl.
If you want to raise the level, gently loosen the nut about a ½ turn and re-tighten the lockscrew. Re-check the level and repeat as needed. If you want to lower the level, you will need to loosen the nut slightly to break the lockscrew loose, then tighten the nut a ½ turn and re-tighten the lockscrew and repeat as needed. Be sure you hold the lockscrew still as you tighten the nut to ensure the float height will change accordingly.
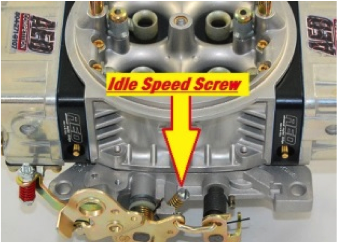 Check the engine’s idle speed. If you want to raise the idle speed, simply tighten the primary idle speed screw. To lower the idle speed, loosen the idle speed screw.
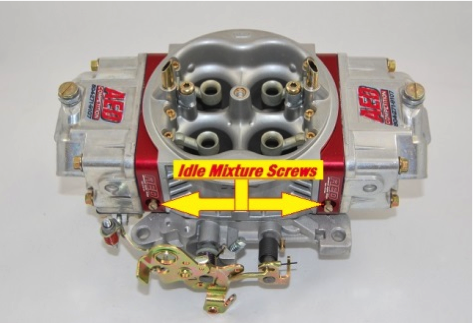 The idle mixture screws will be the next adjustment to check. These 4 screws control the amount of fuel given to the engine @ idle. The easiest way to remember how these work is to think of them as a water faucet/spigot on the side of you house. The more you loosen the handle, the faster the water comes out. On the other hand, the more the handle is tightened, you turn the water off. These mixture screws function in exactly the same fashion. The most important thing is to be sure what ever changes you make to 1 corner of the carburetor, the other 3 will need to follow suit. This will ensure equal distribution and help eliminate driveability issues as well.
- To richen the idle, loosen all 4 screws equally about ¼ - ½ turn each. Re-check idle quality and repeat as needed.
- If the idle is too rich initially, you will need to lean the idle by tightening the 4 screws equally about ¼ - ½ turn each. Re-check idle quality and repeat as needed.
- BE CAREFUL NOT TO OVERTIGHTEN THE IDLE MIXTURE SCREWS AS THIS CAN DAMAGE THE NEEDLE TIP.
- It is perfectly normal for idle speed to vary as you change the idle mixture screw adjustment. If idle speed varies greatly from the desired idle speed while making adjustments, adjust primary idle screw as needed after setting all 4 screws equally.
 The accelerator pump nozzels or “squirters” are sized according to the size of the carburetor. Different intake and cylinder head combinations may require more or less pump shot. If the engine seems to have an off-idle stumble, changing the size of the squirter itself can fix this issue. The first thing to do is determine whether it’s a lean or a rich stumble.
- If the engine seems to take a deep breath and then accelerate quickly (almost like the iginition cuts off for a split second), it’s generally a lean stumble. Check the size of the squirter on the primary side and install the next largest size. If that seems to help, but not completely eliminate it, try increasing the size of the secondary squirter.
- If the engine seems to have a “blubber” or is lazy to accelerate then cleans up as it builds RPM, it’s generally a rich stumble. Check the size of the squirter on the primary side and install the next smallest size. If that seems to help, but not completely eliminate it, try decreasing the size of the secondary squirter.
If these first few initial adjustments don’t seem to cure any issues that you may have, feel free to call or e-mail us here at the shop and one of our techs will be glad to assist you with any further adjustments. Thank you again for purchasing our products and we look forward to helping you make your project the best it can be!
FOR ADDITIONAL TECH SUPPORT WITH AED PRODUCTS
Jeff : (804) 271-9107 ext 17
This email address is being protected from spambots. You need JavaScript enabled to view it.